Creating Login and Registration Form in Ionic:
Here we learn “Creating Login and Registration Form in Ionic“.
After successfully installing ionic, if you not able to install ionic please follow, now you are ready to build your first app.
In this tutorial, I’ll guide you how to start a new application, how to add pages, navigation between pages, how to design pages, how to include CSS and typescript, so Let’s get started!
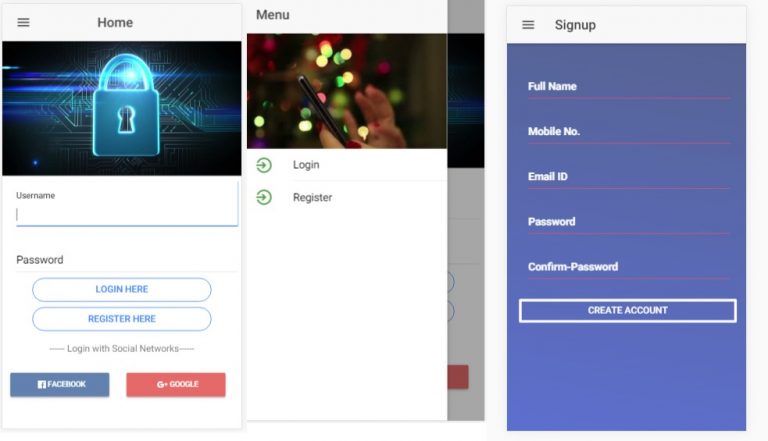
Output Example –

Ionic provide some awesome templates:
– side menu ionic templete:
A layout with a swipeable menu on the side.
– blank ionic templete:
Basic starter with a single page.
– super ionic templete:
Starter project with over 14 ready to use page designs.
– tutorial ionic templete:
A guided starter project.
Start a new app-
open your terminal/command prompt and run:
Step 1:
ionic start firstproject sidemenu –type=ionic-angularDesc:
– Start: start inform CLI to create new app.
– Project Name: first project is a project name app
– Side menu: side menu will be the starter template of ionic app, which automatically contain side menu
– type:
Type define which type of project you want to create. for ionic1 project we use -v1 flag for ionic2 project we -v2 flag and for ionic 3 we use -type=ionic-angular.
Now we have a directory with firstproject name we go inside the directory. by using cd cammand.
Command for display output:
cd firstproject

ionic serve
(ionic serve run this command inside the project directory,
Now we have a directory with a name firstproject inside the path you choose)
Project Structure is like –
There are two pages – home and list
and both contain 3- important files for more information about folder structure please click here
Login Page Design

Register page design

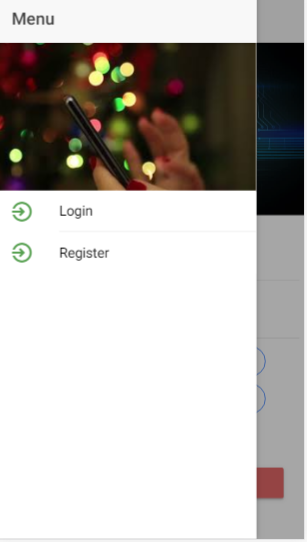
Sidebar menu design

Before start design the page or going adding pages we need to add all these pages into app.module.ts file within src/app folder.
Import the files
import { LoginPage } from '../pages/login/login';

import { RegisterPage } from '../pages/register/register';
add these pages name
@NgModule({
declarations: [
MyApp,
LognPage,

RegisterPage
],

entryComponents: [
MyApp,
LoginPage,

RegisterPage
],
So let’s start the design part of the login page —- open the Login.html file and write these code there
<ion-header>
 <ion-navbar color="primary">
  <ion-title> Login <ion-title>
 <ion-navbar>
</ion-header>

<ion-content>
 <div>
  <ion-img [width]="imgWidth" [height]="imgHeight"
  src="assets/imgs/image_name"></ion-img>
<div>

<ion-row>
 <ion-item>
  <ion-label floating Username> </ion-label>
  <ion-input type="text" name="Username" autocapitalize="none"></ion-
  input>
  </ion-item>
</ion-row>

<ion-row>
 <ion-item>
  <ion-label floating Password> </ion-label>
  <ion-input type="password" name="Password" autocapitalize="none">
  </ion-input>
 </ion-item>
</ion-row>

<on-row>
 <button ion-button clear>Forgot Password?</button>
</ion-row>

<div>
 <button ion-button outline>Sign IN</button>
</div>
<p> OR </p>

<p> Signin with your Social Networks</p>
</div>
<div>

<ion-row>
 <ion-col width-50>
  <button ion-button icon-right>
   <ion-icon ios="logo-facebook" md="logo-facebook"></ion-icon>
   Facebook</button>
  </ion-col>
<ion-col width-50>
<button ion-button icon-right>

<ion-icon ios="logo-googleplus" md="logo-googleplus"></ion-icon>
Google</button></ion-col></ion-row><ion-row><ion-col width-100>

<button ion-button clear (click)="signup()"> Not a Member yet? Signup Now</button>
</ion-col>
</ion-row>
</div>
</ion-content>
Open the login.scss (design part of app, you can use normal css or scss code as well) file and write these code there….
page-home {
.face1{
background-color:#6281AF;
color:#FFFFFF;
font-size:80%;
width:90%;

}
.gog1{
background-color:#E56969;
color:#FFFFFF;
font-size:80%;
width: 90%
}

.user{
color:black !important;
}

.cen1{
text-align:center;
}

.wid1{
width:75%;
}
Now open the login.ts(contain the logic part of app which is basically in typescript) file and write these code there….
import { Component } from '@angular/core';
import { NavController } from 'ionic-angular';
import { LoadingController } from 'ionic-angular';
import { LoginPage } from '../../pages/login/login';
@Component({
selector: 'page-home',
templateUrl: 'home.html'
})
export class HomePage {
constructor(public navCtrl: NavController,public loadingCtrl: LoadingController) {
}
login() {
let loader = this.loadingCtrl.create({
content: "Please wait...",
duration: 3000
});
loader.present();
loader.dismiss();
let alert = this.alertCtrl.create({
title: 'Login Successfully',
message: 'User Login Successfully',
buttons: [{
text: 'Ok',
role: 'ok',
handler: () =&amp;amp;amp;amp;gt; {
this.navCtrl.push(LoginPage );
}
}]
});
alert.present();
}
}We are going to start the design part of the register page – open the register.html (contain the structure part of app, we find all design related component on ionic official site ) file and write these code there
<ion-header>

<ion-navbar>
<button ion-button menuToggle>
  <ion-icon name="menu"></ion-icon>
</button>

<ion-title> Signup </ion-title>
  </ion-navbar>
</ion-header>

<ion-content padding class="back">
 <img src="assets/imgs/applogo.png">
<ion-list no-lines>

<ion-item>
 <ion-label floating class="label_text_color"><b>Full Name</b></ion-
  label>
 <ion-input type="text" #fullname name="fullname"></ion-input>
</ion-item>

<ion-item>
 <ion-label floating class="label_text_color"><b>Mobile No.</b></ion-
  label>
 <ion-input type="number" #mobile name="mobile"></ion-input>
</ion-item>

<ion-item>
 <ion-label floating class="label_text_color"><b>Email ID</b></ion-
   label>
 <ion-input type="email" #email name="email"></ion-input>
</ion-item>

<ion-item>
 <ion-label floating class="label_text_color"><b>Email ID</b></ion-
  label>
 <ion-input type="email" #email name="email"></ion-input>
</ion-item>

<ion-item>
 <ion-label floating class="label_text_color"><b>Password</b></ion-
  label>
 <ion-input type="password" #password name="password"></ion-input>
</ion-item>

<ion-item>
 <ion-label floating class="label_text_color"><b>Confirm-Password</b>.
  </ion-label>
 <ion-input type="password" #confirmpass name="confirmpass"></ion-input>
</ion-item>

<button ion-button class="register_page_design"
  outline> Create Account </button>
</ion-list>
</form></ion-content>
Open the register.scss (design part of app, you can use normal css or scss code as well) file and write these code there….
.back{
width: 100%;
height: 100%;
background:linear-gradient(10deg,#5D6FCE,#55628F);
}

.scroll-content{
text-align: center;
}

ion-card.card{
background:rgba(232,230,230,0.6px);
border-radius: 10px;
}

.item{
background:rgba(232,230,230,0px);
}
ion-input{
border-bottom: #FD4D73 solid 1px;
}
.register_page_design{
width: 100%;border: 4px solid white;margin-top: 30px;color: white;
}

.label_text_color{
color: white
}
Open the register.ts(contain the logic part of app which is basically in typescript) file and write these code there….
import { Component } from '@angular/core';
import { IonicPage, NavController, NavParams } from 'ionic-angular';
import { AlertController, LoadingController } from 'ionic-angular';
@IonicPage()
@Component({
selector: 'page-signup',
templateUrl: 'signup.html',
})
export class SignupPage {
constructor(public navCtrl: NavController,public loadingCtrl: LoadingController public navParams: NavParams,public alertCtrl: AlertController) {
}
ionViewDidLoad() {
console.log('ionViewDidLoad SignupPage');
}
register(){
let loading = this.loadingCtrl.create({
content: 'Please wait...'
});
loading.present();
let alert = this.alertCtrl.create({
loading.dismiss();
title: 'Registrtion Successful!',
message: 'Registrtion Successful!,
buttons: [{
text: 'Ok',
role: 'ok',
handler: (){
this.navCtrl.push(HomePage);
}
}]
});
alert.present();
}
}
else{
let alert = this.alertCtrl.create({
title: 'Registrtion Unuccessful!',
message: 'Registrtion Unuccessful!',
buttons: [{
text: 'Ok',
role: 'ok',
handler: () =&amp;amp;amp;amp;gt; {
//this.navCtrl.push(login);
}
}]
});
alert.present();
}
}
}Now we are ready to add platform and generate apk
Add ios platform
$ ionic cordova platform add iosAdd android platform
$ ionic cordova platform add androidRemove ios platform
$ ionic cordova platform rm iosRemove android platform
$ ionic cordova platform rm iosGenerate apk for android device
ionic cordova build androidSo in the end, we learn “Creating Login and Registration Form in Ionic“, how to navigate between pages, add alert box and loading, if you have any doubt please comment.
You can find my post on medium as well click here please follow me on medium as well.
If have any query/issue, please feel free to ask.
Happy Coding Guys.

Hi, I am a professional Ionic and React Native Pixel Perfect App Designer and Developer, with expertise in Client Communication, Bug Fixing, Third Party Lib, Version Control Tools, Requirement Understanding, and managing teams, I have 6+ years of experience in the same domain as well as in Codeigniter, JS, IoT, and more than 10 other languages. For the last 6+ years, not a single day went without design/development.
Please follow me on Medium: https://nehadwivedi1004.medium.com/


You are so cool! I do not think I’ve truly read through something
like this before. So good to discover another person with some original thoughts on this topic.
Really.. many thanks for starting this up. This site is something that
is required on the internet, someone with a little originality!
I have been surfing online more than three hours lately, yet
I never found any fascinating article like yours.
It is beautiful worth enough for me. In my opinion, if all web owners and bloggers made just
right content as you probably did, the net might be a lot more helpful than ever before.
Woah! I’m really digging the template/theme of this site.
It’s simple, yet effective. A lot of times it’s challenging to get that “perfect balance” between superb usability and appearance.
I must say you have done a fantastic job with this.
Also, the blog loads extremely quick for me on Opera.
Excellent Blog!
Now I am going to do my breakfast, later than having my breakfast coming over
again to read further news.
thank you for your feedback.
I like it when folks get together and share views.
Great website, keep it up!
It’s very trouble-free to find out any topic on net as compared to textbooks, as I
found this paragraph at this web page.
Hі there, constantly i used to check ᴡebpage poѕts here in the
early hours in the break of day, as i enjoy to find out more and more.
thank you guyz…
I’m nnow not sure the place you’re getting your info, however great topic.
I must spend a while finding out much more orr figuring out more.
Thanks for fantastic info I was searching for this info for my mission.
Yes! Finally something about quotes
Hey There. I found your blog the use of msn. That is a really neatly written article.
I will make sure to bookmark it and return to read more of your helpful information. Thank you for the post.
I’ll certainly comeback.
Just want to say your article is as astonishing.
The clarity for your post is simply cool and i can think you
are knowledgeable in this subject. Well with your permission allow me to take hold of your feed to keep up to date
with coming near near post. Thanks one million and please continue the
gratifying work.
I am now not positive where you are getting your information, but good topic.
I must spend some time learning more or working out more.
Thank you for wonderful info I used to be in search of this information for
my mission.
Hey there! This is my 1st comment here so I just wanted to give a quick shout out and tell you I really enjoy reading your articles.
thank you
Hola! I’ve been following your web site for some time now
and finally got the bravery to go ahead and give you a shout out from Kingwood Tx!
Just wanted to tell you keep up the great work! https://wooricasino114.com