Set RoleBased Sidemenu:
Today we are going to learn “Set RoleBased Sidemenu and publish event after Login in ionic“, for doing this we need to know more about app.componenet.ts file, because we check role when our app is initialised, which is done in app.componenet.ts file.
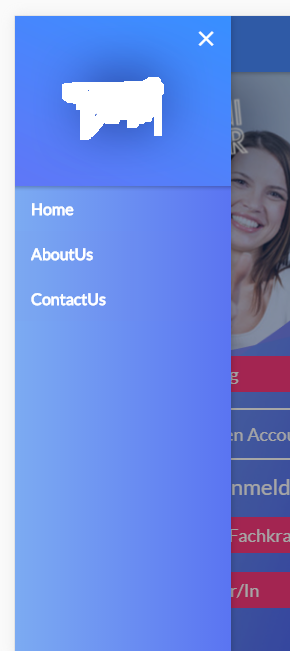
Output Example Before Login-

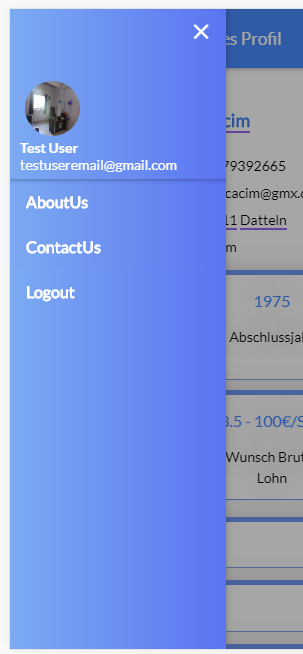
Output Example After Login-

So let’s start to set sidemenu…
Follow these steps for setting the role based side menu in app –
Step1 :
Firstly we create the ionic3 project for tabs template.
ionic cordova start RoleBasedSidemenu tabs –type=ionic-angularStep2 :
Now we goto path of our project and open src/app folder.
project path is – ProjectPath/src/app/app.component.ts
import {Component, ViewChild} from '@angular/core';
import {Nav, Platform,MenuController, Events} from 'ionic-angular';
import {StatusBar} from '@ionic-native/status-bar';
import {SplashScreen} from '@ionic-native/splash-screen';
import {ContactPage} from '../pages/contact/contact';
import {AboutUsPage} from '../pages/about-us/about-us';
import {SearchPage} from "../pages/search/search";
import {MainPage} from "../pages/main/main";

@Component({
 templateUrl: 'app.html'
})

export class MyApp
{
 @ViewChild(Nav) nav: Nav;
 rootPage: any ;
 activePage: any;
 icons1: any;
 pages: Array<{title: string, component: any}>;
 page: Array<{title: string, component: any, isVisible: boolean}>;
 role: any;

constructor(public events: Events,public menuCtrl: MenuController,public statusBar: StatusBar, public splashScreen: SplashScreen)
 {
 this.initializeApp();
 this.icons1 = ['flask', 'wifi', 'beer'];

//These pages show before login user
this.BeforeLogin =[
{title: 'Home', component: HomePage, isVisible: true},
{title: 'AboutUs', component: AboutUsPage, isVisible: true},
{title: 'ContactUs', component: ContactPage, isVisible: true},
];

//These pages show After Login User
this.AfterLogin=[
{title: 'Search', component: SearchPage},
{title: 'Test1', component: Test1Page},
{title: 'Test2', component: Test2Page},
];

//when user login then we create the event, after that here we check if user is loggedin or not, and set the pages according to this
events.subscribe('userLogin:created', userLogin => {
  if(userLogin){
    this.loginState = true;
  }
else{
  this.loginState = false;
 }
});
}

initializeApp() {
this.platform.ready().then(() => {
this.statusBar.styleDefault();
this.splashScreen.hide();
}
});
}

public openPage(page, index_value) {
this.nav.setRoot(page.component, {page_no: index_value});
this.activePage = page;
}

public checkActivePage(page) {
return page === this.activePage;
}

home(){
this.menuCtrl.close();
this.nav.setRoot(ActivationPage);
}

logout() {
this.loginState = false;
this.menuCtrl.close();
this.nav.setRoot(ActivationPage);
}
}
Step3:
Now we check the condition in app.html file because this html file is loaded first after app initilization, so we goto src/app/app.html file
<ion-menu [content]="content">
<ion-header>

<div class="fixed-height side_img">
<button ion-button clear menuClose="left" >
<ion-icon ios="ios-close" md="md-close" ></ion-icon>
</button>

//when user is logged in we show his profile picture name and email in sidemenu top
<img *ngIf="loginState" src="{{picture}}" class="circle-pic">
<div class="loggedin" *ngIf="loginState">
<b>{{first_name}} {{last_name}}</b><br>
<span>{{user_email}}</span></div>
</div>
</ion-header>

<ion-content class="side-menu-gradient">

<ion-list>
//Remove after checking user loggedin condition dynmically
<ion-item *ngIf="loginState == false" (click)="home()" class="side-menu-gradient" >
<b>Home</b></ion-item>
//adding logout after checking user loggedin condition dynmically
<ion-item *ngIf="loginState" (click)="logout()" class="side-menu-gradient" ><b>logout</b></ion-item>
//start of calling app.component.ts pages after checking the loggedin condition
<ion-item *ngIf="loginState">
<button menuClose ion-item *ngFor="let p of AfterLogin" (click)="openPage(p)" color="btnclr">
<b> {{p.title}}</b>
</button></ion-item>
<ion-item *ngIf="loginState == false">
<button menuClose ion-item *ngFor="let p of BeforeLogin" (click)="openPage(p)" color="btnclr">
<b> {{p.title}}</b>
</button></ion-item>
//end of checking loggedin condition
</ion-list>

</ion-content>

</ion-menu>
<ion-nav [root]="rootPage" #content swipeBackEnabled="false"></ion-nav>
Step4:
Now we design login page for create the subscriber to checking logedin condition.
<html>

<ion-header>
<ion-navbar color=”primary”>
</ion-navbar>
</ion-header>

<ion-content padding class=”login”>

<ion-list class=”back_trans list-position”>
<form [formGroup]=”ulogin”>

<ion-item class=”item item-trns text-center”>
<ion-label><b>Email Adresse</b></ion-label>
</ion-item >

<ion-item class=”input_box_class1 item-trns-col”>
<ion-input type=”email” value=”” formControlName=”Email” [class.invalid]=”!ulogin.controls.Email.valid && (ulogin.controls.Email.dirty || submitAttempt)” placeholder=”me@mycompany.com” class=”back_trans ” style=”color: white”></ion-input>
</ion-item>

<ion-item *ngIf=”!ulogin.controls.Email.valid && (ulogin.controls.Email.dirty || submitAttempt)” class=”item item-trns text-center”>
<p class=”p”>Email Adress is required</p>
</ion-item>

<ion-item class=”item item-trns text-center”>
<ion-label><b>Password</b></ion-label>
</ion-item>

<ion-item class=”input_box_class1 item-trns-col”>
<ion-input type=”Password” value=”” formControlName=”Password” [class.invalid]=”!ulogin.controls.Password.valid && (ulogin.controls.Password.dirty || submitAttempt)” placeholder=”Password” class=”back_trans” style=”color: white”></ion-input>
</ion-item>

<ion-item *ngIf=”!ulogin.controls.Password.valid && (ulogin.controls.Password.dirty || submitAttempt)” class=”item item-trns text-center”>
<p class=”p”>Password is required</p>
</ion-item>

<ion-item class=”item-trns-col1″>
<button type=”submit” ion-button color=”danger” round (click)=”login(ulogin)” class=”login_button btn_login”>Login</button>
</ion-item>
</form>
</ion-list>
</ion-content>

//For checking how to submit a form and send form data to server please check this(https://www.itechinsiders.com/login-form-using-formbuilder-validator-and-rest-api/)
</html>
Step5:
Now we create the subscriber for checking login condition.
import { Component } from '@angular/core';
import {AlertController, IonicPage, NavController, NavParams, LoadingController, Platform} from 'ionic-angular';
import { Events } from 'ionic-angular';
import { Storage } from '@ionic/storage';

@IonicPage()
@Component({
selector: 'page-login',
templateUrl: 'login.html',
})
export class LoginPage {

fatchdata : any = {};
ulogin : FormGroup;
loginstate:any;
submitAttempt: boolean = false;
constructor(private storage: Storage,public events: Events,public navParams: NavParams,public alertCtrl : AlertController) {

}

login(ulogin) {
this.api_data.UserLogin(data).then(data =>{
this.fatchdata = data;
console.log("access_token : " + this.fatchdata.data.access_token);
var usertoken = this.fatchdata.data.access_token;

//After calling Api and submite the data, we set the token or role

this.events.publish('usertoken:created', usertoken);
if (this.fatchdata.data.access_token != null && this.fatchdata.user_type == 'Admin' && this.fatchdata.activation_status == 1) {
this.loginstate=true;
//Now we publish the event which we call anywhere, where we want to check the login condition
this.events.publish('userLogin:created', usertoken,this.loginstate);
this.navCtrl.setRoot(TabsPage);
}
else if (this.fatchdata.data.access_token != null && this.fatchdata.user_type == 'Employer' && this.fatchdata.activation_status == 1)
{
this.loginstate=true;
this.events.publish('userLogin:created', usertoken,this.loginstate);
this.navCtrl.setRoot(TabsPage);
}
else{
let alert = this.alertCtrl.create({
title: 'Anmeldung fehlgeschlagen!',
message: this.fatchdata['message'],
buttons: [{
text: 'Ok',
role: 'ok',
handler: () => {

}
}]
});
alert.present();
}
});
}
}

ionViewDidLoad() {
console.log('ionViewDidLoad LoginPage');
}
}
So finally we learn how to open side menu conditionally and publishing event after login.
if you have any query or doubt regarding this post or any of my post please comment, i’ll reply as soon as possible.
So we complete the tutorial which is “Set RoleBased Sidemenu and publish event after Login in ionic“.
You can find my post on medium as well click here please follow me on medium as well.
You can find my next post here.
If have any query/issue, please feel free to ask.
Happy Coding Guys.

Hi, I am a professional Ionic and React Native Pixel Perfect App Designer and Developer, with expertise in Client Communication, Bug Fixing, Third Party Lib, Version Control Tools, Requirement Understanding, and managing teams, I have 6+ years of experience in the same domain as well as in Codeigniter, JS, IoT, and more than 10 other languages. For the last 6+ years, not a single day went without design/development.
Please follow me on Medium: https://nehadwivedi1004.medium.com/

